Popular Posts

Tuesday 27 September 2011

The art of Pattern (Part 2)

Photoshop မွာ Default ထည့္ေပးထားတဲ့ Pattern ေတြကေတာ့ Continuous ျဖစ္ေအာင္ ဖန္တီးေပးထားၿပီးျဖစ္ပါတယ္။ Continuous pattern ဆိုတာကေတာ့ Indefinitely Fill လုပ္ႏိုင္ၿပီး တစ္ခုနဲ႔တစ္ခုၾကားထဲမွာ ဆက္ရာရွာမရတဲ့ Pattern ေတြကို ဆိုလိုတာပါ။
ဒီတစ္ေခါက္ Tutorial ကေတာ့ အဲလို Continuous pattern မ်ားကို ဖန္တီးျခင္းျဖစ္ပါတယ္။ ဒီလိုဖန္တီးထားတဲ့ Pattern ေတြကို Jpeg အေနနဲ႔ Save လုပ္ၿပီး အျခားေသာ AutoCAD, 3D Studio Max အစရွိတဲ့ Software ေတြမွာ Plug-in အေနနဲ႔လည္း အသံုးျပဳႏိုင္ပါေသးတယ္။
၁) ပထမဦးဆံုး New File (110 pix - 80 pix) တစ္ခု ဖြင့္ပါ။ ပံုမွန္အားျဖင့္ Square pattern မ်ားကို ဖန္တီးၾကပါသည္။ ဒီ Tutorial မွာေတာ့ ပိုရွင္းသြားေအာင္ Rectangular Pattern လုပ္ျပျခင္းျဖစ္ပါသည္။
ၿပီးရင္ (Filter > Render > Fiber) ျဖင့္ အလြယ္ဆံုး Pattern တစ္ခုကို Fill လုပ္လိုက္ပါ။ Pattern နဲ႔ ပိုတူသြားေအာင္ အဲဒီအေပၚမွာ ခပ္႐ႈပ္႐ႈပ္ Line ေတြကို Brush Tool ျဖင့္ ဆဲြလိုက္ပါတယ္။
အဲဒီ ပံုကို Continuous Pattern အျဖစ္ ေျပာင္းပါမယ္။

၂) Filter > Other > Offset သုိ႔၀င္ပါ။ Offset တန္ဖိုးမ်ားအျဖစ္ Horizontal = 55 pix နဲ႔ Vertical = 40 pix အသီသီးထားပါမယ္။ မူလပံုတစ္ခုလံုး Pixel တန္ဖိုးမ်ားရဲ႕ တစ္၀က္ဆီျဖစ္ပါတယ္။ ဒါဆိုရင္ ေအာက္ကအတိုင္းေတြ႕ရမွာပါ။
၃) Clone Stamp Tool ကို အသံုးျပဳၿပီး အလယ္မွ ဆက္ရာကဲ့သို႔ျဖစ္ေနေသာ ေနရာမ်ားကို ဖာေထးပါ။ Brush ကေတာ့ Soft rounded brush ပဲျဖစ္ပါတယ္။ ဒီေနရာမွာ သတိထားရမွာက ပံုရဲ႕အနားစြန္းမ်ားကို မထိမိေစရန္ဂ႐ုစိုက္ပါ။
ၿပီးလွ်င္ေတာ့ ပံုအတိုင္းေတြ႕ရပါမည္။
၄) ဒီပံုကို (Edit > Define Pattern) ျဖင့္ Save လုပ္ၿပီး Paint Bucket Tool, Pattern ျဖင့္ Fill လုပ္ၿပီး အသံုးျပဳႏိုင္ပါၿပီ။
အခုနမူနာလုပ္ျပထားတဲ့ Pattern က နားလည္လြယ္ေအာင္ အျဖဴအမည္းနဲ႔ လုပ္ျပထားျခင္းျဖစ္ပါတယ္။ ၿပီးေတာ့ အဆင့္ (၃) Clone Stamp လုပ္တဲ့ေနရာမွာ ပံုရဲ႕ အနားစြန္းေတြကို ထိခိုက္မိတဲ့အတြက္ Continuous pattern စစ္စစ္မျဖစ္ေသးပါဘူး။ Fill လုပ္တဲ့ ၾကားထဲမွာ ဆက္ရာေတြ ေပၚေနေသးတာကို ေတြ႕ႏိုင္ပါတယ္။ အဲသလိုဆိုရင္ အဆင့္ (၂) ျဖစ္တဲ့ Offset Filter ကို တစ္ေခါက္ျပန္၀င္ၿပီး Clone Stamp ကို ျပန္လုပ္ရပါလိမ့္မယ္။ အကယ္၍ Clone အလုပ္မ်ားသြားျပန္ရင္လည္း ပံုက ၀ါးသြားတတ္ပါတယ္။ ဒါကိုေတာ့ လိုအပ္သလို ခ်ိန္ဆရမွာျဖစ္ပါတယ္ေနာ္…။

တကယ္တမ္းေျပာရရင္ ဒီနည္းကို အသံုးျပဳျခင္းျဖင့္ မိမိကိုယ္တိုင္ ဓာတ္ပံု႐ိုက္ထားတဲ့ (ဒါမွမဟုတ္) Photo Blog ေတြမွာ အလြယ္တကူရႏိုင္တဲ့ Sand, Granite, Gravel, Fiber အစရွိေသာ Pattern မ်ားကို Continuous pattern မ်ားအျဖစ္ အလြယ္တကူျပဳလုပ္ႏိုင္ပါတယ္။
အျခားေသာ Brick, Tile, Grill အစရွိတာေတြကို Continuous ျပဳလုပ္တာကေတာ့ ဒီ Tutorial အတိုင္းျဖစ္ေပမယ့္ အနည္းငယ္ပို လက္၀င္ၿပီး စိတ္ရွည္ရပါတယ္။ ေနာင္ Tutorial ေတြမွာ အလ်ဥ္းသင့္ရင္ ေျပာျပေပးသြားပါမယ္။

The art of Pattern

ဦးစြာသတိျပဳရမွာက အသံုးျပဳမယ့္ Document အရြယ္အစားပါ၊ အဲဒီ Document ထဲမွာ မိမိျပဳလုပ္မယ့္ Pattern ကိုဘယ္လိုအရြယ္အစား မ်ိဳးနဲ႔ေပၚခ်င္သလဲဆိုတာ တြက္ခ်က္ရပါမယ္။ ဥပမာ Document က ၆ လက္မပတ္လည္ ကုိ Resolution က ၁၀၀ နဲ႔ဆိုပါစို႔၊ (Pixel Dimension = ၆၀၀ by ၆၀၀) အဲဒီ Document တစ္ခုလံုးကို က်ားကြက္ပံု ေတြကိုေနရာအနံ့ Fill ခ်င္တယ္ဆိုပါေတာ့။ အကြက္ေပါင္းကို အလ်ား ေရာ အနံပါ ၁၂ ကြက္လိုခ်င္ရင္ 600 / 12 = 50 Pixel ရမွာပါ။

New Document တစ္ခုကို ၁ လက္မပတ္လည္နဲ႔ Resolution ကို 100 နဲ႔ ယူပါ။ ဒါဆိုရင္ Pixel Dimension အရဆိုရင္ 100 by 100 pixel ရွိပါတယ္။ က်ားကြက္ကိုအျဖဴနဲ႔အနက္ေရာင္ကြက္ေတြ ျပဳလုပ္ပါမယ္၊ အကြက္တစ္ကြက္ကို 50 pixel ယူလိုက္ရေအာင္။ Ruler Bar ကိုေခၚထားပါဦး (Ctrl + R)။ ျပီးရင္ View>New Guide menu ကိုေရြးပါ၊ New Guide option မွာ Orientation ကို Vertical ထားျပီး Position ကို 0.5 in ထားျပီး OK ႏွိပ္ပါ။


အဲဒီေနာက္ Deselect လုပ္ပါ။ ျပီးမွ Document တစ္ခုလံုးကို Select (Ctrl + A) လုပ္ပါ၊ Edit>Define Pattern menu ကိုေရြးပါ။ Define Dialog box မွာ Preview ေလးတစ္ခုပါျမင္ေနရမွာပါ။ Name ေနရာမွာ chess လိုိ႔ရိုက္လိုက္ပါ။ ျပီးရင္ OK ႏွိပ္ပါ။ ပံုကိုၾကည့္ပါ။
အခုဆိုရင္ chess ဆိုတဲ့ Pattern တစ္ခုကို သင္ဖန္တီးျပီးသြားပါျပီ။ အသံုးျပဳၾကည့္ရေအာင္၊ New Document ကိုအထက္မွာေျပာခဲ့တဲ့အတိုင္း ၆ လက္မပတ္လည္ကို Resolution 100 နဲ့ Create လုပ္ပါ။ ျပီးရင္ Edit>Fill မွာ Pattern type ကိုေရြးပါ၊ Pattern Picker ရဲ့ ေနာက္ဆံုးမွာ သင္ Create လုပ္ထားတဲ့ Pattern ေလးကိုျမင္ရမွာပါ။
အခုေနာက္ထပ္ Pattern တစ္ခုကိုထပ္လုပ္ၾကည့္ရေအာင္။ New Document တစ္ခုကိုအရင္အတိုင္းပဲ ၁ လက္မပတ္လည္နဲ႔ Resolution ကို 100 နဲ႔ပဲယူပါ။ ျပီးရင္အရင္အတိုင္းပဲ Guide လိုင္းႏွစ္ခုကို အလ်ားလိုက္ေရာ ေထာင္လိုက္ပါျပဳလုပ္ပါ။ ပံုပါအတိုင္းေအာက္ဘက္ ႏွစ္ကြက္ကို အနီေရာင္ Fill လိုက္ပါ။
အဲဒီေနာက္ Edit>Stroke ကို Color မွာအျဖဴေရာင္ Location မွာInside နဲ့ Width ကေတာ့ 3 pixel နဲ့လုပ္ပါမယ္။ ပံုကိုအခုလိုျမင္ရပါျပီ။
ျပီးေနာက္ ဘယ္ဘက္အစြန္အေပၚကအကြက္ကိုအနီေရာင္ Fill လိုက္ပါမယ္။ ျပီးရင္ Edit>Stroke ကို Color မွာအျဖဴေရာင္ Location မွာInside နဲ့ Width ကေတာ့ 3 pixel နဲ့လုပ္ပါမယ္။
အဲဒီေနာက္မွာေတာ့ Deselect လုပ္ပါမယ္။ Magic Wand ကိုေရြးျပီး ေနာက္ဆံုးလုပ္ခဲ့တဲ့ အေပၚကေလးေထာင့္ကြက္ကို Select လုပ္ပါ။ ျပီးရင္ ထို Selection ကိုဘယ္ဘက္သို႔ Left Arrow Key ကိုႏွိပ္ျခင္းျဖင့္ေရြပါ။ ျပီးရင္အနီေရာင္ျပန္ Fill ပါမယ္။ ပံုကိုၾကည့္ပါ။
ညာဘက္ကအကြက္ကိုလဲ ဒီအတိုင္းပဲျပဳလုပ္လိုက္ရင္ ဒီလိုပံုရလာမွာပါ။ Magic Wand နဲ့ Select လုပ္ျပီးရင္ေတာ့ Selection ကိုေရြတဲ့အခါမွာ  ညာဘက္ကို ေရြရမွာေနာ္။
Select All (Ctrl + A) လုပ္ပါ၊ ျပီးရင္ေတာ့ Edit>Define Pattern ကို ႏွိပ္ျပီး Pattern တစ္ခုလုပ္လိုက္ရံုပါပဲ။ Pattern Name ကိုေတာ့ brick လုိ႔ေပးထားပါဦး။ ဒါဆိုရင္ သင္ Pattern ႏွစ္ခုျပီးလုပ္ျပီးပါျပီ၊ New Document တစ္ခုယူျပီး ဒီ Pattern ကို Fill လုပ္ၾကည့္ရင္ အုတ္ကြက္ပံုေလး ေတြ ေတြ႔ရမွာပါ၊ စမ္းၾကည့္ပါ။
ေနာက္တစ္ဆင့္က အဲဒီ Pattern ႏွစ္ခုကို File တစ္ခုအေနနဲ႔ Save ထားဖို႔ပါပဲ၊ အဲဒီအတြက္ေတာ့ Edit>Preset Manager ကိုသြားပါ။
Preset type မွာ Patterns ကိုေရြးပါ၊ Pattern Picker ရဲ့ေနာက္ဆံုးမွာသင္ျပဳလုပ္ခဲ့တဲ့ Pattern ႏွစ္ခုရွိေနပါတယ္။ chess ကို Click လုပ္ပါ၊ ျပီးရင္ေတာ့ brick ကို Shift Key ပါတြဲႏွိပ္ျပီး Click လုပ္ပါ ( Selection ထဲေပါင္းထည့္ တဲ့သေဘာပါ)။ Pattern ႏွစ္ခုစလံုး Select ျဖစ္ေန ေတာ့မွ Save Set ဆိုတဲ့ Button ကို Click လုပ္ပါ။ File Save ဖို႔နာမည္ ေတာင္းတဲ့အခါ မိမိၾကိဳက္ႏွစ္သက္ရာေပးလိုက္ပါ၊ အခုေတာ့ mmphotoshop ဆိုတဲ့ နံမည္ကိုေပးလိုက္ပါတယ္။ ျပီးရင္ Preset Manager ကိုပိတ္လိုက္ပါ။ သင္႔ကိုယ္ပိုင္ Pattern file တစ္ခုတည္ေဆာက္ ျပီးသြားပါျပီ။ သင္ျပဳလုပ္ထားေသာ Pattern ကို Pattern Fly Out menu မွ Load Pattern menu ျဖစ္ေစ Replace Pattern menu ျဖင့္ျဖစ္ေစ ေခၚယူအသံုးျပဳႏိုင္ပါတယ္။ Pattern file List အျဖစ္ Fly Out menu တြင္ ေပၚေစလိုပါက PhotoShop ကို Reset လုပ္ေပးလိုက္ရံုပါပဲ။
ဒီနည္းအတိုင္းပဲ သင္လိုခ်င္ေသာ Pattern File မ်ားကိုတည္ေဆာက္ထားႏိုင္ပါတယ္။ တစ္ခုေျပာစရာရွိေသးတာက Edit>Define Pattern menu ဟာ Selection လံုး၀မရွိလဲေပၚပါတယ္၊ အဲဒီအခါမွာ Pattern area ဟာ Document တစ္ခုလံုးလို႔ဆိုလိုတာပါ။ ေနာက္အေျခအေနတစ္ခု က Selection ဟာ လံုး၀ေလးေတာင့္ျဖစ္ေနရပါမယ္။ ေအာက္မွာျပထားတဲ့ Selection ေတြဟာဆိုရင္ Define Pattern menu ကိုေပၚလာေစမွာ မဟုတ္ပါဘူး။ ေသေသခ်ာခ်ာသတိထားရမွာပါ။

အလင္းအေမွာင္ကိုသံုး၍ထုမ်ား ဖန္တီးျခင္း

Tint and Shade
အရာ၀ထၳဳမ်ားဟာ အလင္းေၾကာင့္သာ ထုသေဘာကိုျမင္ရတာပါ၊ ေနာက္တစ္ခုက အလင္းရဲ့ ဆန္႕က်င္ဘက္မွာ အေမွာင္သဘာ၀ ရွိေနပါတယ္။ ဒီအလင္းနဲ့အေမွာင္ရွိမွသာ အရာ၀ထၳဳေတြကို ထုသေဘာရေအာင္ဖန္တီးႏိုင္မွာပါ။ Photoshop မွာလည္းဒီသေဘာသဘာ၀ကို အသံုးျပဳပါတယ္။ အရာ၀ထၳဳတိုင္းမွာ ကိုယ္ပိုင္အေရာင္ (local color) မ်ားရွိၾကပါတယ္။ ဥပမာ ငွက္ေပ်ာသီးတစ္လံုးရဲ့ local color ေျပာပါဆိုရင္ အ၀ါေရာင္ပါ။ အဲ့ဒီအေရာင္မ်ားေပၚကိုအလင္းထိေရာက္တဲ့အခါ အေရာင္ကေဖြးျဖဴလာပါတယ္၊ အလင္း မသက္ေရာက္ႏိုင္တဲ့အေမွာင္ဘက္မွာ ေတာ့ အမဲေရာင္သန္းလာပါတယ္။ ဒီအခ်င္းအရာကို Tint and shade ကိုအသံုးျပဳျပီးဖန္တီးႏိုင္ပါတယ္။ အေရာင္တစ္ခုကို အျဖဴေရာင္နဲ့ ေရာစပ္လိုက္ရင္ Tint လို့ေခၚျပီး အမဲေရာင္နဲ့ေရာစပ္လိုက္ရင္ေတာ့ shade effect ကိုရရွိမွာပါ၊ လက္ေတြ႕လုပ္ၾကည့္ရေအာင္။
Photoshop မွာသင့္ေတာ္မယ္အရြယ္နဲ့ new document တစ္ခုေခၚပါ၊ ျပီးရင္ပံုမွာျမင္ရတဲ့အတိုင္း guide line ရွစ္ခုကိုဆြဲပါ Ruler bar (if necessary press Ctrl+r) မွာ click and drag လုပ္ျပီးလိုခ်င္တဲ့ေနရာမွာ drop လုပ္ပါ။ ဒါမွမဟုတ္အတိအက်လိုခ်င္ရင္ေတာ့ New Guide မွာ amount ရိုက္ထည့္ေပးပါ (View>New Guide...)။ ျပီးရင္အျပင္ေဘာင္လိုင္းေလးအတိုင္း Rectangular Marquee သံုးျပီး selection လုပ္ပါ။ အေရာင္တစ္ခုခုကို fill လုပ္ပါ။ ဒါဆိုရင္ဒီပံုအတိုင္းျမင္ေနရပါျပီ။
ျပီးရင္ Polygon Lasso tool ကိုသံုးျပီးေဒါင့္ေလးကိုပံုမွာျမင္ရတဲ့အတိုင္း select လုပ္ပါ၊
Edit>fill...ကိုႏိွပ္ပါ၊ Contents မွာေတာ့ white ကိုေရြးျပီး Opacity မွာ 40 % ေလာက္ထားျပီး OK ႏွိပ္ပါ၊ ပံုကဒီလိုျဖစ္သြားပါျပီ
Deselect လုပ္ပါ (Select>Deselect) ၊ျပီးရင္ ေအာက္ဘက္အျခမ္းကိုလဲဒီနည္းအတိုင္းလုပ္ပါဦး။ Fill လုပ္တဲ့အခါမွာေတာ့ Contacts မွာ Black ေရြးျပီး Opacity ကိုေတာ့ 10 % ပဲထားပါ။ အနက္ေရာင္က စြန္းထင္းလြယ္လို့ေလွ်ာ့လိုက္ရတာပါ၊ အခုဆိုရင္ ပံုဟာဒီလိုမ်ိဳးျဖစ္ လာပါျပီ။
Deselect လုပ္ျပီး Guide line ေတြကို hide လုပ္လိုက္ရင္ (press Ctrl+; ) ဒီလိုပံုစံမ်ိဳးျမင္ရပါျပီ၊ေအာက္ကပံုကိုၾကည့္ပါ။
ဒီနည္းဟာအလြယ္ဆံုးနဲ့ အသံုးအ၀င္ဆံုးပါပဲ၊ သဘာ၀နဲ့လဲနီးစပ္ပါတယ္။ ဒီနည္းကိုအသံုးျပဳျပီးေအာက္မွာပါတဲ့ပံုေလးကို ေလ့က်င့္ခန္း လုပ္ၾကည့္ပါဦး၊ လြယ္ပါတယ္၊ အခ်ိန္သိပ္မၾကာေလာက္ပါဘူး။
ေနာက္တစ္ခုေျပာစရာရွိတာက အလင္းရဲ့လားရာဦးတည္ဘက္ပါ၊ အလင္းသီအိုရီတစ္ခုမွာက အလင္းသည္ လင္းရာမွ ေမွာင္ရာသို႕  မိမိအင္းအားရွိသမွ် အရွိန္ျဖင့္ တေရြ႕ေရြ႕သြားျပီး အရိပ္တြင္ဆံုးသည္္ လို့ေဖာ္ျပထားပါတယ္။ အေပၚက ဥပမာေတြမွာအလင္းရဲ့ ဦးတည္ ဘက္ကိုေမးရင္ 135 ဒီဂရီမွ  -45 ဒီဂရီ သို့မဟုတ္ Top & Right side Light လို့ေျပာရပါမယ္၊(အလင္းသက္ေရာက္ပံုကိုေျပာရာတြင္ အရာ၀ထၳဳ ဘက္ က ေျပာပါသည္၊ မိမိဘက္မွၾကည့္ေျပာျခင္းမဟုတ္ပါ)။ အလင္းဟာ ထုထည္တစ္ခုကို ပတ္လည္ျဖစ္ေပၚေစႏိုင္မႈေပးႏိုင္ ပါတယ္။ အရာ၀ထၳဳ တစ္ခု အေပၚအလင္းက်ေရာက္မႈကိုၾကည့္လွ်က္ အလင္းရဲ့တည္ေနရာကိုသိနိုင္ပါတယ္။ အလင္းသက္ေရာက္ပံုမ်ားကိုေအာက္ပါပံုတြင္ ေလ့လာ ၾကည့္ပါ
Gradient
Tint and shade မ်ားအေၾကာင္းအျပီးမွာ ေနာက္ထပ္ေျပာစရာရွိေသးတာက အလင္းေၾကာင့္ ျဖစ္ေပၚလာရေသာ အေရာင္အေသြး ေျပာင္းလဲျခင္းမ်ားပါ။ သူက tint and shade လိုလံုး၀ရုတ္တရက္ေျပာင္းလဲျခင္းမ်ိဳးမဟုတ္ဘဲ တေျဖးေျဖး ေျပာင္းလဲျခင္းမ်ိဳးပါ။ ဥပမာ sphere တစ္လံုးကိုအလင္းေပးလိုက္တဲ့အခါမွာျမင္ရတဲ့ တစ္ျခမ္းလင္းတစ္ျခမ္းေမွာင္ပံုစံမ်ိဳးပါ၊ ရုတ္တရက္ လင္းျခင္းေမွာင္ျခင္းမ်ိဳးမဟုတ္ဘဲ လင္းရာမွတေျဖးေျဖးေမွာင္သြားျခင္းကိုဆိုလိုတာပါ။ ဒိလိုပံုစံရေအာင္ဆိုရင္ Photoshop မွာ Gradient tool ကိုအသံုးျပဳႏိုင္ပါတယ္။
Photoshop မွာသင့္ေတာ္မယ္အရြယ္နဲ့ new document တစ္ခုေခၚပါ၊ ျပီးရင္ပံုမွာျမင္ရတဲ့အတိုင္း circle တစ္ခုကို elliptical marquee too သံုးျပီးဆြဲပါ၊ elliptical marquee too ကိုေရြးျပီး drawing area မွာ click and drag လုပ္တဲ့အခ်န္မွာ Shift key ႏွိပ္ထားရင္ circle ရလာပါတယ္။ အေရာင္ Fill ထားပါ။ circle ဆြဲျပီးျပီးခ်င္း Deselect မလုပ္ပါနဲ့ဦး။
Tool box မွာ Default Foreground and Background color ဆိုတဲ့ေနရာကို click လုပ္ပါ (သို႕မဟုတ္ d ကိုႏွိပ္ပါ)။ ဒါဆိုရင္ foreground မွာ အနက္ေရာင္နဲ့ background မွာ အျဖဴေရာင္ျဖစ္သြားပါျပီ။ ျပီးရင္ X ကို ႏွိပ္ပါ၊ foreground နဲ့ background ကိုအေရာင္လဲ လို္က္တာပါ။ အခုဆိုရင္ foreground မွာ အျဖဴနဲ့ background မွာ အနက္ေရာင္ျဖစ္သြားပါျပီ။
Gradient Tool ကိုေရြးပါ၊ tool option bar မွာ Radial gradient ကိုေရြးျပီး Opacity ကို 30 % ေလာက္ထားျပီး စက္၀ိုင္းရဲ့ အေပၚဘယ္ ဘက္ေထာင့္ကေန ေအာက္ညာဘက္ေထာင့္ကိုဆဲြပါ။ Deselect လုပ္လို္က္ရင္ဒီလိုပံုရလာပါျပီ။
Foreground နဲ့ background အေရာင္မ်ားကိုတျခားအေရာင္မ်ားသံုးျပီးေတာ့လည္း စမ္းၾကည့္ပါဦး။ အခုလုပ္ထားတာကအေရာင္တစ္ခု အေပၚကိုအျဖဴနဲ့အနက္ေရာင္အုပ္လိုက္ျပီး sphere ပံုစံျဖစ္ေအာင္လုပ္တာပါ။ အလင္းအေမွာင္ေျပင္းလဲခ်င္ရင္ foreground က အျဖဴေရာင္းကို တျဖည္းျဖည္းအနက္ဘက္သို့ခ်ဥ္းကပ္ျခင္းျဖင့္ လည္းေကာင္း Opacity ေျပာင္းလဲ၍ လည္းေကာင္း အလင္းအားေလ်ာ့လာပံု မ်ားလာပံုကိုရမွာပါ၊
အလင္းအင္အား(lighting power) ႏွင့္ပတ္သက္၍
အလင္းအားျပင္းလွ်င္(strong light) အလင္းအားေတာက္ပျပီး အေမွာင္အားျပင္းကာ အရိပ္လဲထင္းပါတယ္။ Contract မ်ားပါတယ္။ သာမန္အလင္း(normal light)ေလာက္ဆိုရင္ အလင္းအေမွာင္အားဟာ အရာ၀ထၳဳရဲ့ထုကိုပိုမိုၾကြေစပါတယ္။ အလင္းအားနဲရင္(dim light)ေတာ့ ထုကိုေပၚလြင္ေစမည္မဟုတ္ပါ။ ဒီေအာက္မွာပါတဲ့ပံုေလးေတြကိုနမူနာထားျပီး Photoshop နဲ့ ဆြဲၾကည့္ပါဦးလား။

Simple Tutorials- Some Tricks to draw your own cartoons!!!

Here I am trying to show you how to draw cartoons. I will try to make as simple as possible. Drawing cartoons is very amusing. You will enjoy learning how to make figures. And maybe, you will also discover a new talent in yourself. Good Try!!! :D

Step 1
But FIRST, you should practice these lines....take a large page (newspapers are best for this practice),
Step 2
We will start with drawing the head. Most important thing to remember while drawing a cartoon head is the shape of the head.

Step 3
How to draw a cartoon head:
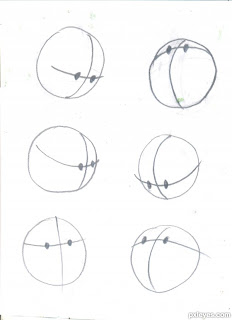
step 1.Draw the shape of the head. I am drawing circle. Add guidelines. This way you will gt the anatomy right.
Step 2.Draws the eys
Step 3.nose
Step 4.draw ears and mouth
Step 5.Now add hair style

Step 4
A face can be looking up or down or anywhere. Guidelines are very helpful to get the head facing in right direction. So first draw the head then put guidelines. Then add eyes, nose, mouth... etc.


Step 5
Facial expressions are an important channel of nonverbal communication. Emotions are expressed mainly through the eyebrows and mouth.

Step 6
Here I have shown step by step process of drawing a cartoon head.
There are 3 heads, egg-shaped, pear-shaped and rectangle.
Now make the outline of the head clearer and give it some hairstyle.

Step 7
Draw the movement of action for your cartoon. For this draw the guidelines.
Draw circles to get the shape of the body. Then draw the facial expressions and the body.
After all this, draw the clothes and other accessories.

Step 8
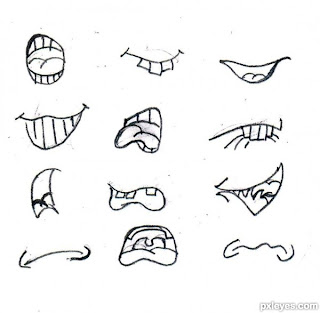
Mouths is an important characteristic of a cartoon character. It changes the expressions.
You can always draw a mouth using a line or a circle.

Step 9
A person's thoughts can be ascertained by looking in his or her eyes.The eyes are simply the most expressive part of funny cartoon faces, and almost every emotion can be shown through the proper illustration of eyes.

Step 10
Hands

Step 11
These hands are drawn with the same process described above...Its easy....just keep practicing .

Step 12
Using these simple steps, you can create your own cartoons.....

Have a great time of creating your own cartoons!!! =)

Monday 26 September 2011

http://images.zwani.com/graphics/funny_pictures/images/44funny-pictures268.jpg


This time , here is some exercises for you to access how your brain can focus on what it see and how fast it is.
Test it out to find out how many are there.

Enjoy !!!


http://images.zwani.com/graphics/funny_pictures/images/56funny-pictures45265.jpg

count the black dots!!!


Hello to our lovely visitors!!!

What I am going to present is the one of the most famous food of Japan. It can also be stated as their traditional food and until now all the Japanese love it to eat it. Not only them, other people have been found out to get used to that food and start addicting. So now please enjoy the picture first and later I will post receipe of how to make easiest and most delicious one.

Thanks